Showing posts with label sql. Show all posts

Tuesday, 19 November 2013

How to Save a File to SQL Database

Here are the steps on how to save a file to sql database using LINQ.


  1. Define your table. In this sample we created an Attachments table having 3 fields FileID (int), FileName (nvarchar(100)) and FileContent (varbinary(MAX)). FileContent field will contain the bytes of our file. We set it to MAX to accommodate any file size.


  1. Add your table to your repository module. In this case I used a simple LINQ to SQL just to make it simple


I created a simple repository class to expose some methods like add, save and get.

public class AttachmentRepository
{
    private DataClassesDataContext db = new DataClassesDataContext();

       public AttachmentRepository()
       {
              //
              // TODO: Add constructor logic here
              //
       }

    public void Add(Attachment at)
    {
        db.Attachments.InsertOnSubmit(at);
    }

    public void Save()
    {
        db.SubmitChanges();
    }

    public List<Attachment> GetAllAttachments()
    {
        return db.Attachments.ToList();
    }
}


  1. Layout your UI. Here we have two controls asp FileUploader and asp Button.


  1. Add a button click event on your upload button. In the code below, we only add a file to the database if there is a file uploaded using .HasFile property. Since we already have a repository using LINQ to SQL we can directly assign the Filename and FileBytes to our attachment class.

protected void btnUpload_Click(object sender, EventArgs e)
    {
        if (FileUploadSample.HasFile)
        {
            AttachmentRepository atRepo = new AttachmentRepository();
            Attachment at = new Attachment();
            at.FileName = FileUploadSample.FileName;
            at.FileContent = FileUploadSample.FileBytes;
            atRepo.Add(at);
            atRepo.Save();
        }       
   }


  1. Verify your Database if the file was indeed saved.


Finally I added a gridview to show the uploaded data


Wednesday, 30 October 2013

Adding SQL Maintenance Cleanup Task

This article is a follow up on Creating a Simple SQL Maintenance Plan where we added a Maintenance Cleanup Task in our maintenance plan. This will show you the steps on how to add a maintenance cleanup task in order to house keep our backup files.


  1. Drag a Maintenance Cleanup Task from toolbox. Double click to edit properties.
  2. In properties window we can set which folder to watch and what is the file extension. We can also set the number of days, weeks, months or years on how long SQL needs to keep the files.
  3. Maintenance Cleanup Task Properties


  4. Click OK button to save settings.
  5. Sample Maintenance Cleanup Task


In the above example, the Maintenance Cleanup Task will delete all backup files (with bak as file extension) that are older than 4 weeks from the selected folder in the properties window.


Creating a Simple SQL Maintenance Plan

In this article, I will discuss the steps on how to create a simple maintenance plan in SQL that will backup both database and transaction logs.

Here are the steps to follow:
  1. Right click Maintenance Plan >> Select New Maintenance Plan.
  2. New Maintenance Plan


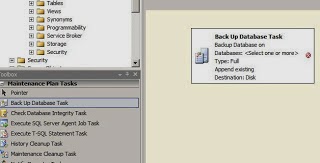
  3. Drag a Back up Database Task from toolbox.
  4. Back Up Database Task


  5. Double click Back up Database Task to set the properties. Set Backup type to FULL.
  6. Back Up Database Task


  7. Add another Back Up Database Task and rename it to Back Up Transaction Log Task.
  8. Back Up Database Task


  9. Double click Backup Transaction Log Task to set properties. Set Backup Type to Transaction Log.
  10. Back Up Transaction Log Task


In the steps mentioned above, we did not shrink the .ldf file but rather we simply backup the transaction log after full database back up. The effect of backing up the transaction log tells SQL Server that it is safe to reuse the space consumed by the transaction log. So if the size of transaction log at that time is 300 MB, SQL will reuse the 300 MB space to record new transactions instead of consuming more hard disk space.

As a finishing touch you can add a File Maintenance Task to delete the backup files in server. Note: If it is production I hope you back up your database somewhere before you delete the backup in your server.

Maintenance Cleanup Task


Saturday, 5 October 2013

Restore Web Application By Using Content Database Backup

Below are the steps on how to restore a SharePoint web application by using the content database backup. (e.g. Testing2 is the name of content database backup)

  1. Go to the SharePoint central administration and create new web application with the same name & database name that you will restore.
  2. In Application Management >> Content databases, select your newly created web application and then delete the newly created content db (remove content database)
  3. In Sql Server, restore your content database backup. If there's an error saying that it's currently in use, just wait for 3 to 5 mins and then try again.
  4. In Application Management >> Content databases, add a content database. Set the database name equal to the restored content db in step 3. (for this case, it's Testing2)


Tuesday, 1 October 2013

Shrink Database Logs

Shrinking the transaction log file is a process of reducing the size of the transaction log. This process is important because if the transaction log file is left unchecked it can grow until it consumes the hard disk space of your server.

Listed below are the steps on how to truncate or shrink database log files (LDF) in your Development or Local Servers. In these steps we will set the database into a Simple Recovery Model which automatically reclaims log space. 
  1. Right click database >> Options >> Set Recovery Model to Simple >> OK
  2. Right click database >> Tasks >> Shrink >> Files
  3. Select File type = Log >> OK
  4. Set back the Recovery Model to Full

For more information about recovery model refer to http://msdn.microsoft.com/en-us/library/ms189275.aspx


Error - The site collection could not be restored

I encountered this error while restoring a site collection in a separate content database in another server. The complete error message is:

"The site collection could not be restored. If this problem persists, please make sure the content database are available and have sufficient free space."

Below are the steps that I've done to debug and fix the issue:

  1. I checked the size of the hard disk drives and it has sufficient free space. 
  2. I tried to restore it in another PC / server and I have restored it successfully. (That's why I wondered why this error happens only in that particular server)
  3. I checked the design of dbo.Sites table in the newly created content db and found out that there are two missing columns, namely FullUrl and UserAccountDirectoryPath. So, I added manually these columns and after that I have successfully restored the site collection in that server.

FullUrl column


UserAccountDirectoryPath column