Tuesday 26 November 2013

Common STSADM Commands

Stsadm is a command-line tool that provides access to the complete set of Office SharePoint Server 2007 operations. It can be used from the command line or with batch files or scripts. Stsadm must be run on the server itself and you must be a member of the local Administrators group on the server in order to use it. Stsadm is located at the following path on the drive where SharePoint Products and Technologies is installed: %COMMONPROGRAMFILES%\microsoft shared\web server extensions\12\bin.


How to use:

In command prompt, go to this directory:

C:\Program Files\Common Files\Microsoft Shared\web server extensions\12\BIN

and then use either of the following commands:


Backup and Restore Site

>> to backup a site collection
                stsadm -o backup -url <site collection url> -filename <name of the backup file>

      example:  to backup sitecollection1 and save the backup file to drive C:

                stsadm -o backup -url "http://www.vpc.com/sites/sitecollection1" -filename "C:\sitecollection1.bak"


>> to restore a site collection
                stsadm -o restore -url <site collection url> -filename <name of the backup file>

      example: to restore sitecollection1 into a new site collection:

                stsadm -o restore -url "http://www.abc.com/sites/newsitecollection" -filename "C:\sitecollection1.bak"


Import and Export Subsite

>> to export a subsite
                stsadm -o export -url <subsite url> -filename <name of the backup file>

     example:
                stsadm -o export -url "http://www.vpc.com/log" -filename "C:\vpclog.bak"


>> to import a subsite
                stsadm -o import -url <subsite url> -filename <name of the backup file>

      example:
                stsadm -o import -url "http://www.abc.com/log" -filename "C:\vpclog.bak"


SetSiteLock

>> to lock the site collection as read-only:
                stsadm -o setsitelock -url <site collection url> -lock readonly

      example:
                stsadm -o setsitelock -url http://www.vpc.com -lock readonly


>> to unlock the site collection:
                stsadm -o setsitelock -url <site collection url> -lock none

      example:
                stsadm -o setsitelock -url http://www.vpc.com -lock none


Install / Uninstall & Activate / Deactivate Feature

>> to deactivate feature
                stsadm -o deactivatefeature -filename path of the Feature.xml file relative to the 12\TEMPLATE\FEATURES folder> -url <site url> -force

      example:
                stsadm -o deactivatefeature -filename "DomainRequestTaskWFCT\Feature.xml" -url http://www.abc.com -force


>> to uninstall feature
                stsadm -o uninstallfeature -filename <path of the Feature.xml file relative to the 12\TEMPLATE\FEATURES folder > -force

      example:
                stsadm -o uninstallfeature -filename "DomainRequestTaskWFCT\Feature.xml" -force


>> to install feature
                stsadm -o installfeature -filename <path of the Feature.xml file relative to the 12\TEMPLATE\FEATURES folder > -force

      example:
                stsadm -o installfeature -filename "DomainRequestTaskWFCT\Feature.xml" -force


>> to activate feature
                stsadm -o activatefeature -filename path of the Feature.xml file relative to the 12\TEMPLATE\FEATURES folder> -url <site url> -force

      example:
                stsadm -o activatefeature -filename "DomainRequestTaskWFCT\Feature.xml" -url http://www.abc.com -force


Friday 22 November 2013

Display List Header of a List View Web Part

When you add a custom list view web part on a page, the list header is not displaying by default unlike the other web parts namely Categories, Other Blogs and Links.


In order to add a list view web part on a page with list header (for example, you want to use your custom list as a left navigation menu, similar to Categories web part in SharePoint blog site), replace the <ListViewXml> with the item below and then change the View Name value equal to the listview webpart id (__WebPartId).

<ListViewXml xmlns="http://schemas.microsoft.com/WebPart/v2/ListView">&lt;View Name="{D5DE4857-09A5-49CC-8EB3-5D26EDC40238}" Type="HTML" Hidden="TRUE" DisplayName="" Url="/blog/default.aspx" Level="1" BaseViewID="4" ContentTypeID="0x"&gt;&lt;Toolbar Type="None"/&gt;&lt;ViewHeader&gt;&lt;HTML&gt;&lt;![CDATA[ &lt;div class="ms-WPBody"&gt; &lt;div class="ms-navheader"&gt;]]&gt;&lt;/HTML&gt;&lt;HTML&gt;&lt;![CDATA[&lt;a ]]&gt;&lt;/HTML&gt;&lt;HTML&gt;&lt;![CDATA[ id="defviewurl]]&gt;&lt;/HTML&gt;&lt;Counter Type="View"/&gt;&lt;HTML&gt;&lt;![CDATA["&gt;]]&gt;&lt;/HTML&gt;&lt;ListProperty Select="Title" HTMLEncode="TRUE"/&gt;&lt;HTML&gt;&lt;![CDATA[&lt;/a&gt;]]&gt;&lt;/HTML&gt;&lt;HTML&gt;&lt;![CDATA[&lt;/div&gt; &lt;table cellpadding="0" cellspacing="0" border="0" class=""&gt;]]&gt;&lt;/HTML&gt;&lt;/ViewHeader&gt;&lt;ViewEmpty&gt;&lt;HTML&gt;&lt;![CDATA[ &lt;div class="ms-WPBody"&gt; &lt;div class="ms-navheader"&gt;]]&gt;&lt;/HTML&gt;&lt;HTML&gt;&lt;![CDATA[&lt;a ]]&gt;&lt;/HTML&gt;&lt;HTML&gt;&lt;![CDATA[ id="defviewurl]]&gt;&lt;/HTML&gt;&lt;Counter Type="View"/&gt;&lt;HTML&gt;&lt;![CDATA["&gt;]]&gt;&lt;/HTML&gt;&lt;ListProperty Select="Title" HTMLEncode="TRUE"/&gt;&lt;HTML&gt;&lt;![CDATA[&lt;/a&gt;]]&gt;&lt;/HTML&gt;&lt;HTML&gt;&lt;![CDATA[&lt;/div&gt; &lt;table cellpadding="0" cellspacing="0" border="0" class="ms-navSubMenu2"&gt;]]&gt;&lt;/HTML&gt;&lt;HTML&gt;&lt;![CDATA[&lt;tr&gt;&lt;td&gt;&lt;div class="ms-BlogEmptyListText"&gt;]]&gt;&lt;/HTML&gt;&lt;HTML&gt;There are no items in this list.&lt;/HTML&gt;&lt;HTML&gt;&lt;![CDATA[&lt;/div&gt;&lt;/td&gt;&lt;/tr&gt;]]&gt;&lt;/HTML&gt;&lt;HTML&gt;&lt;![CDATA[&lt;/table&gt;&lt;/div&gt;]]&gt;&lt;/HTML&gt;&lt;/ViewEmpty&gt;&lt;ViewBody&gt;&lt;HTML&gt;&lt;![CDATA[&lt;tr class="ms-CategoryTitleRow"&gt;&lt;td class="ms-CategoryTitleCell" id="lnkurl]]&gt;&lt;/HTML&gt;&lt;Column Name="ID" URLEncode="TRUE"/&gt;&lt;HTML&gt;&lt;![CDATA["&gt;]]&gt;&lt;/HTML&gt;&lt;Field Name="URL"/&gt;&lt;HTML&gt;&lt;![CDATA[&lt;/td&gt;&lt;/tr&gt;]]&gt;&lt;/HTML&gt;&lt;/ViewBody&gt;&lt;ViewFooter&gt;&lt;HTML&gt;&lt;![CDATA[&lt;/table&gt;&lt;/div&gt;]]&gt;&lt;/HTML&gt;&lt;/ViewFooter&gt;&lt;RowLimitExceeded&gt;&lt;HTML&gt;&lt;![CDATA[&lt;div class="ms-BlogMoreLinks"&gt;&lt;a href="]]&gt;&lt;/HTML&gt;&lt;ListProperty Select="DefaultViewUrl"/&gt;&lt;HTML&gt;&lt;![CDATA[" ID=onetidMoreFavs&gt;
                                        ]]&gt;&lt;/HTML&gt;&lt;HTML&gt;(More Links...)&lt;/HTML&gt;&lt;HTML&gt;&lt;![CDATA[
                                        &lt;/a&gt;&lt;/div&gt;]]&gt;&lt;/HTML&gt;&lt;/RowLimitExceeded&gt;&lt;Query&gt;&lt;OrderBy&gt;&lt;FieldRef Name="Order" Ascending="TRUE"/&gt;&lt;/OrderBy&gt;&lt;/Query&gt;&lt;ViewFields&gt;&lt;FieldRef Name="URL"/&gt;&lt;/ViewFields&gt;&lt;RowLimit&gt;30&lt;/RowLimit&gt;&lt;/View&gt;</ListViewXml>


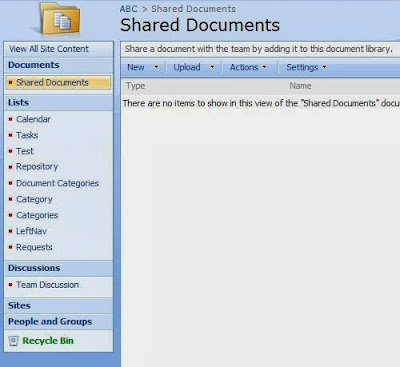
After doing the modifications, it will now show the list header of the custom list as shown below:


How to Update People Picker Field Programmatically

People picker field is a SharePoint column that allows you to select users, distribution lists, and security groups within the SharePoint Foundation user interface. If you have a user's requirement that needs to update the people picker field programmatically, you can try the following solution.

In your ascx page, add a hidden SharePoint people picker field (where visible property is equal to false) by using the following syntax:

<spuc:PeopleEditor AllowEmpty="false" ValidatorEnabled="true" id="userPicker" runat="server" ShowCreateButtonInActiveDirectoryAccountCreationMode="true" SelectionSet="User" MultiSelect="false" Visible=false />

But in order to use this field in a page, you need to add a directive at the top of the page:

<%@ Register TagPrefix="spuc" Namespace="Microsoft.SharePoint.WebControls" Assembly="Microsoft.SharePoint, Version=12.0.0.0, Culture=neutral, PublicKeyToken=71e9bce111e9429c" %>

In code behind, add the following:

PickerEntity entity = new PickerEntity();
entity.Key = vr.RName //display name;
entity.DisplayText = vr.RName //display name;
entity = userPicker.ValidateEntity(entity);
                       
PickerEntity entity2 = new PickerEntity();
entity2.Key = entity.Description;
entity2 = userPicker.ValidateEntity(entity2);

                       
SPFieldUserValue fuv = new SPFieldUserValue(web, Convert.ToInt32(entity2.EntityData[PeopleEditorEntityDataKeys.UserId]), entity2.Description);


// "RName" is the name of the sharepoint people picker field to update
listItem["RName"] = fuv;

HandleEventFiring eventFiring = new HandleEventFiring();
eventFiring.AccDisableEventFiring();
listItem.Update();
eventFiring.AccEnableEventFiring();


-------------------

public class HandleEventFiring : SPItemEventReceiver
        {
            public void AccDisableEventFiring()
            {
                this.DisableEventFiring();
            }

            public void AccEnableEventFiring()
            {
                this.EnableEventFiring();
            }
        }


Wednesday 20 November 2013

Workflow Error - Failed on Start (retrying)

If you encounter this error message "workflow error - failed on start (retrying)" in visual studio .net workflow, you can try the following solutions to fix the issue:

  • Change the Correlation Token value to be unique. The workflow and each activity should have a unique value. The workflow itself and each task you need to reference in the workflow must have a separate correlation token. Refer to this link http://msdn.microsoft.com/en-us/library/ms475438.aspx for more details. 

In the below example, I set the correlation token of the workflow in onWorkflowActivated1 to "workflowToken" and then the correlation token of the workflow task createEndorserTask to "taskToken".

correlation token

Figure 1: workflowToken


correlation token

Figure 2: taskToken


  • Check the dll in the workflow.xml (CodeBesideAssembly). It should be the same as the one in the GAC.


Tuesday 19 November 2013

How to Save a File to SQL Database

Here are the steps on how to save a file to sql database using LINQ.


  1. Define your table. In this sample we created an Attachments table having 3 fields FileID (int), FileName (nvarchar(100)) and FileContent (varbinary(MAX)). FileContent field will contain the bytes of our file. We set it to MAX to accommodate any file size.


  1. Add your table to your repository module. In this case I used a simple LINQ to SQL just to make it simple


I created a simple repository class to expose some methods like add, save and get.

public class AttachmentRepository
{
    private DataClassesDataContext db = new DataClassesDataContext();

       public AttachmentRepository()
       {
              //
              // TODO: Add constructor logic here
              //
       }

    public void Add(Attachment at)
    {
        db.Attachments.InsertOnSubmit(at);
    }

    public void Save()
    {
        db.SubmitChanges();
    }

    public List<Attachment> GetAllAttachments()
    {
        return db.Attachments.ToList();
    }
}


  1. Layout your UI. Here we have two controls asp FileUploader and asp Button.


  1. Add a button click event on your upload button. In the code below, we only add a file to the database if there is a file uploaded using .HasFile property. Since we already have a repository using LINQ to SQL we can directly assign the Filename and FileBytes to our attachment class.

protected void btnUpload_Click(object sender, EventArgs e)
    {
        if (FileUploadSample.HasFile)
        {
            AttachmentRepository atRepo = new AttachmentRepository();
            Attachment at = new Attachment();
            at.FileName = FileUploadSample.FileName;
            at.FileContent = FileUploadSample.FileBytes;
            atRepo.Add(at);
            atRepo.Save();
        }       
   }


  1. Verify your Database if the file was indeed saved.


Finally I added a gridview to show the uploaded data


Monday 11 November 2013

Selecting Colors Using Microsoft FrontPage 2003

When designing a web page, sometimes you want to copy and use a specific color in an existing web site. But the problem is you don’t know what the exact color is. In this case, you can use Microsoft FrontPage 2003 to select colors by their values.

Here are the steps to follow:

1. Open the web site, picture or other file that has the color that you want to copy.

2. Open the Microsoft FrontPage and resize it to smaller window. Be sure that the FrontPage window is on the top of the page in step #1.

3. On the Formatting toolbar, click the next  to FONT COLOR   » select More Colors...
The More Colors dialog box appears.

More Colors


4. Click the Select button and then point your mouse (outside the More Colors dialog box) to the color that you want to copy or reuse. (In our example, the color of the yahoo page toolbar has been selected.)


5. Copy the hex value in the Value text box and then modify it in the format #XXXXXX.
(e.g. {F6,E8,A9} -> #F6E8A9 ). From this format, you can now use it in your web page design.


Thursday 7 November 2013

Change the Redirection URL of SharePoint Buttons

When you open a site using SharePoint designer and view one of its site pages, for example EditForm.aspx, you can see the html code of the default OK and Cancel buttons in the HTML Code view. 

The html code of the buttons are:

<SharePoint:SaveButton runat="server" ControlMode="Edit" id="savebutton1" Text="OK"/>

<SharePoint:GoBackButton runat="server" ControlMode="Edit" id="gobackbutton2"/>


In the above html code, you will notice that there are no available attributes / properties for the elements <SharePoint:SaveButton> and <SharePoint:GoBackButton> where you can specify or edit its redirection url. Basically, the redirection url of these buttons are being handled already by SharePoint so there is no way to make the default buttons redirect to a different url.

But there is a workaround to achieve that kind of requirement. Instead of using the default sharepoint buttons, you can use the HTML button <input type="button"> as shown below.

<input type="button" class="ms-ButtonHeightWidth" value="OK" name="btnSave" onclick="javascript: {ddwrt:GenFireServerEvent('__commit;__redirect={}')}" />

<input type="button" class="ms-ButtonHeightWidth" value="Cancel" name="btnCancel" onclick="javascript: {ddwrt:GenFireServerEvent('__redirect={}')}" />


Here we set the class attribute equal to "ms-ButtonHeightWidth" in order to have the same look and feel as of the default SharePoint button. In the __redirect={} part of the onclick attribute value, you can put any URL you like, for example __redirect={http://www.google.com} or __redirect={/news/PressReleases/}. Please take note that there should be no quotes around the URLs passed into the __redirect directive.


Here is the full example:

<input type="button" class="ms-ButtonHeightWidth" value="OK" name="btnSave" onclick="javascript: {ddwrt:GenFireServerEvent('__commit;__redirect={http://www.google.com}')}" />

<input type="button" class="ms-ButtonHeightWidth" value="Cancel" name="btnCancel" onclick="javascript: {ddwrt:GenFireServerEvent('__redirect={/news/PressReleases/}')}" />


Wednesday 6 November 2013

Filter SharePoint List Views by Date and Time

By default if you do filtering of views by DateTime field via web, it will only filter the views by date, not including time. In order to include time, you need to modify the view using SharePoint Designer. Here are the steps on how to do it.

  1. Open the site in which the list or document library resides using Microsoft Office SharePoint Designer.
  2. Locate the list or document library and open the .aspx file associated with the view (e.g. “AllItems.aspx”)
  3. Click the Code tab and locate the CAML query associated with the filter (search on the name of your DateTime field, e.g. "StartDateTime"). 
  4. Edit the CAML query to include the IncludeTimeValue attribute (IncludeTimeValue="True"). Please note that you need to include spaces exactly as shown in the sample below: 


            &lt;Gt&gt;
             &lt;FieldRef Name=&quot;StartDateTime&quot;/&gt;
             &lt;Value Type=&quot;DateTime&quot; IncludeTimeValue="True"&gt;
              &lt;Today/&gt;
             &lt;/Value&gt;


Saturday 2 November 2013

Filter SharePoint List Using URL Parameters

When you filter a list in SharePoint, you will notice that the parameters for filtering are appended automatically to the URL of the page that displays the list. So if you have a requirement to create a custom Search page, you can use the url parameters. For example, using SharePoint designer, you can add the list view web part on the page and then manipulate the url parameters for filtering by using javascript.

Here are the parameters that can be added in the URL to filter the SharePoint list:

  • to filter by one column

               ?FilterField1=<InternalName>&FilterValue1=<Value>

  • to filter by one column with multiple values

              ?FilterName=<InternalName>&FilterMultiValue=<value1>;<value2>
                         ** FilterMultiValue should be semicolon separated

  • to filter by two columns

              ?FilterField1=<InternalName>&FilterValue1=<Value1>&FilterField2=<InternalName>&FilterValue2=<Value2>


Note:
   <InternalName> = the internal name of the column
   <Value> = the value of the column


Examples:

1. To display SharePoint list items where Document Date = '08/16/2011'

http://www.vpc.com/sites/blog/Lists/Posts/AllPosts.aspx?FilterField1=DocumentDate&FilterValue1=08/16/2011

2. To display SharePoint list items where Category = 'Category1' and Document Date = '08/16/2011'.

http://www.vpc.com/sites/blog/Lists/Posts/AllPosts.aspx?FilterField1=PostCategory&FilterValue1=Category1&FilterField2=DocumentDate&FilterValue2=08/16/2011

3. To display SharePoint list items where Title = 'Test' OR Title = 'Sample Title'

http://www.vpc.com/sites/blog/Lists/Posts/AllPosts.aspx?FilterName=Title&FilterMultiValue=test;sample%20title

4. To display SharePoint list items where Title contains 'sample'

http://www.vpc.com/sites/blog/Lists/Posts/AllPosts.aspx?FilterName=Title&FilterMultiValue=*sample*


Internal Names of SharePoint User Profile Fields

SharePoint user profile contains information about the user such as name, title, phone number, email address, etc. It has two types, namely WSS Profile and MOSS Profile. WSS Profile can be accessed from Welcome User >> My Settings page (_layouts/userdisp.aspx?.......) while MOSS Profile can be accessed from My Site (../Person.aspx?....) and it is created when users are imported into the system from AD or LDAP.

Basically, there are two MOSS Timer jobs that control the replication of the user profiles per web application. These are Profile Synchronization and Quick Profile Synchronization. The difference between the two is Profile Synchronization updates the WSS profile whereas Quick Profile Synchronization updates the MOSS profiles. Both of these jobs can be found in Central Administration -> Operations -> Timer Job definitions. 

If you want to access the user profile columns / fields in code, you need to know its equivalent internal names. Actually, the internal names of the columns are different depending on the types of user profile.

So for your reference, I have listed below the user profile fields and its corresponding internal names.


WSS Profile (User Information List) MOSS Profile (SSP User Profile)
Display Name Internal Name Display Name Internal Name
Account Name Account name AccountName
First name FirstName First name FirstName
Last name LastName Last name LastName
Name Title Name PreferredName
Work phone WorkPhone Work phone WorkPhone
Office Office Office Office
Department Department Department Department
Title JobTitle Title Title
Work e-mail EMail Work e-mail WorkEmail
User name UserName


Wednesday 30 October 2013

Adding SQL Maintenance Cleanup Task

This article is a follow up on Creating a Simple SQL Maintenance Plan where we added a Maintenance Cleanup Task in our maintenance plan. This will show you the steps on how to add a maintenance cleanup task in order to house keep our backup files.


  1. Drag a Maintenance Cleanup Task from toolbox. Double click to edit properties.
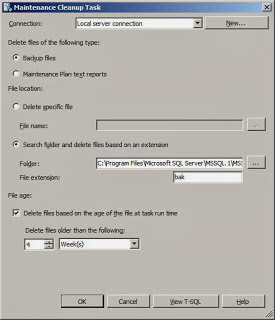
  2. In properties window we can set which folder to watch and what is the file extension. We can also set the number of days, weeks, months or years on how long SQL needs to keep the files.
  3. Maintenance Cleanup Task Properties


  4. Click OK button to save settings.
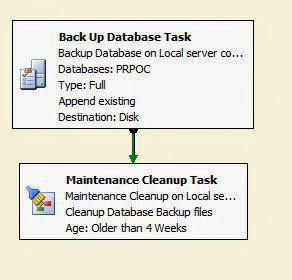
  5. Sample Maintenance Cleanup Task


In the above example, the Maintenance Cleanup Task will delete all backup files (with bak as file extension) that are older than 4 weeks from the selected folder in the properties window.


Creating a Simple SQL Maintenance Plan

In this article, I will discuss the steps on how to create a simple maintenance plan in SQL that will backup both database and transaction logs.

Here are the steps to follow:
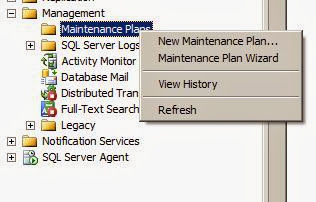
  1. Right click Maintenance Plan >> Select New Maintenance Plan.
  2. New Maintenance Plan


  3. Drag a Back up Database Task from toolbox.
  4. Back Up Database Task


  5. Double click Back up Database Task to set the properties. Set Backup type to FULL.
  6. Back Up Database Task


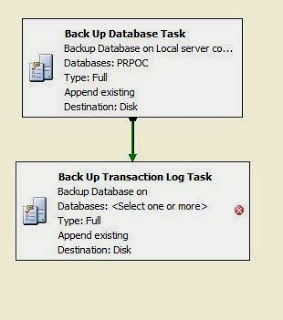
  7. Add another Back Up Database Task and rename it to Back Up Transaction Log Task.
  8. Back Up Database Task


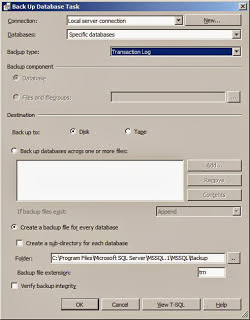
  9. Double click Backup Transaction Log Task to set properties. Set Backup Type to Transaction Log.
  10. Back Up Transaction Log Task


In the steps mentioned above, we did not shrink the .ldf file but rather we simply backup the transaction log after full database back up. The effect of backing up the transaction log tells SQL Server that it is safe to reuse the space consumed by the transaction log. So if the size of transaction log at that time is 300 MB, SQL will reuse the 300 MB space to record new transactions instead of consuming more hard disk space.

As a finishing touch you can add a File Maintenance Task to delete the backup files in server. Note: If it is production I hope you back up your database somewhere before you delete the backup in your server.

Maintenance Cleanup Task


Monday 28 October 2013

How To Highlight Current Page Link on Left Navigation Menu

Last time, I encountered an issue in SharePoint site where the current page link on the left navigation menu is not being highlighted. And as a workaround, I just created a script using jQuery based on the html structure and css class of the left navigation menu.

Here is the sample script:

<script type="text/javascript" src="/_layouts/1033/jquery.js"></script>
<script type="text/javascript">

$(document).ready(function() {
var oUrl = window.location.href;
       
$("table .ms-navitem td a").each(function() {
var ohref = $(this).attr("href");
            if(oUrl.indexOf(ohref) != -1)
            {
                var oClass = $(this).parent().parent().parent().parent().attr("class") + " ms-selectednav";    
                $(this).parent().parent().parent().parent().attr("class", oClass);
            }
});
});

</script>


Basically, in order to explore and understand the html structure of the page, I have used an IE Developer Toolbar as shown below.

IE Developer Toolbar


After adding the script in the master page, the current page link will now be highlighted.

Quick Launch Menu


Tuesday 22 October 2013

Attaching Event Handler To A SharePoint List

Attaching an event handler / event receiver to a custom list in SharePoint can be done programmatically. You can create a console application so that every time you require to attach an event handler to a list, you just need to run that console application.

Below is the full code of the sample console application that will attach an event handler to a SharePoint list via code. Basically, the console application only supports the following type of event:

  • ItemAdding - An event that occurs before an item has been added.
  • ItemAdded - An event that occurs after an item has been added.
  • ItemUpdating - An event that occurs before an item is updated.
  • ItemUpdated- An event that occurs after an item has been updated.
  • ItemDeleting - An event that fires before an item is deleted.
  • ItemDeleted - An event that occurs after an item has been deleted.

Also, the console application requires four input parameters as listed below:
  1. Site URL (the full URL of the SharePoint site)
  2.          e.g. http://www.abc.com/log
  3. List Name (the display name of the list)
  4.          e.g. ListName
  5. Event Receivers (The type of event receivers separated by ';')
  6.          e.g. itemadded;itemupdated
  7. Assembly Path (the location path of the assembly)
  8.          e.g. C:\\Sample.dll

When you run the console application, the format should be:

AttachEventHandlerToSPList <site url> <List Name> <Event Receivers> <Assembly Path>

Example:

AttachEventHandlerToSPList http://www.abc.com/log ListName itemadded;itemupdated C:\\Sample.dll


Code

using System;
using System.Collections.Generic;
using System.Linq;
using System.Text;
using Microsoft.SharePoint;
using System.Reflection;

namespace AttachEventHandlerToSPList
{
    class Program
    {
        static void Main(string[] args)
        {
            string strClassName = string.Empty;
            string strAssembly = string.Empty;
            try
            {
                if (args.Length != 4)
                {
                    Console.WriteLine("ERROR: Invalid no. of parameters. \n");
                    usage();
                    Environment.Exit(1);
                }


                string siteURL = args[0]; // "http://www.abc.com/sites/DomainRequest"; //
                string listName = args[1]; // "Branch";  //   "Domain Account Request Application";
                string eventReceivers = args[2]; // "itemadded;itemupdated"; //   "itemadding";
                string path = args[3]; // "C:\Documents and Settings\Administrator\Desktop\.net workflow\DomainRequest\DomainRequestEventHandler\bin\Release\DomainRequestEventHandler.dll"
                //AssemblyName assemblyName = AssemblyName.GetAssemblyName(@"C:\Documents and Settings\Administrator\Desktop\.net workflow\DomainRequest\DomainRequestEventHandler\bin\Release\DomainRequestEventHandler.dll");
                Assembly assembly = Assembly.LoadFrom(@path);
                strAssembly = assembly.FullName;
                Type[] types = assembly.GetTypes();
               

                foreach (Type type in types)
                {
                    if (type.BaseType.Name == "SPItemEventReceiver")
                        strClassName = type.FullName;
                }


                if (!string.IsNullOrEmpty(eventReceivers))
                {
                    string[] events = eventReceivers.ToLower().Split(';');

                    int nCnt = events.Count();

                    if (nCnt > 0)
                    {
                        using (SPSite site = new SPSite(siteURL))
                        {

                            using (SPWeb web = site.OpenWeb())
                            {
                                SPList list = web.Lists[listName];

                                foreach (string eventType in events)
                                {
                                    DeleteEventHandler(list, eventType, strClassName);

                                    switch (eventType)
                                    {
                                        case "itemadding":
                                            {
                                                list.EventReceivers.Add(SPEventReceiverType.ItemAdding,
                                                    strAssembly,
                                                    strClassName);
                                                list.Update();

                                                Console.WriteLine(string.Format("EventHandler (ItemAdding) has been added correctly in {0}!", listName));
                                                break;
                                            }
                                        case "itemadded":
                                            {
                                                list.EventReceivers.Add(SPEventReceiverType.ItemAdded,
                                                    strAssembly,
                                                    strClassName);
                                                list.Update();

                                                Console.WriteLine(string.Format("EventHandler (ItemAdded) has been added correctly in {0}!", listName));
                                                break;
                                            }
                                        case "itemupdating":
                                            {
                                                list.EventReceivers.Add(SPEventReceiverType.ItemUpdating,
                                                    strAssembly,
                                                    strClassName);
                                                list.Update();

                                                Console.WriteLine(string.Format("EventHandler (ItemUpdating) has been added correctly in {0}!", listName));
                                                break;
                                            }
                                        case "itemupdated":
                                            {
                                                list.EventReceivers.Add(SPEventReceiverType.ItemUpdated,
                                                    strAssembly,
                                                    strClassName);
                                                list.Update();

                                                Console.WriteLine(string.Format("EventHandler (ItemUpdated) has been added correctly in {0}!", listName));
                                                break;
                                            }
                                        case "itemdeleting":
                                            {
                                                list.EventReceivers.Add(SPEventReceiverType.ItemDeleting,
                                                    strAssembly,
                                                    strClassName);
                                                list.Update();

                                                Console.WriteLine(string.Format("EventHandler (ItemDeleting) has been added correctly in {0}!", listName));
                                                break;
                                            }
                                        case "itemdeleted":
                                            {
                                                list.EventReceivers.Add(SPEventReceiverType.ItemDeleted,
                                                    strAssembly,
                                                    strClassName);
                                                list.Update();

                                                Console.WriteLine(string.Format("EventHandler (ItemDeleted) has been added correctly in {0}!", listName));
                                                break;
                                            }
                                    }


                                }
                            }

                        }
                      
                    }
                    else
                    {
                        Console.WriteLine("Please input EventReceivers Type (separated by ';' if multiple)");
                    }
                }
            }

            catch (Exception ex)
            {

                Console.WriteLine("Error! stack:" + ex.StackTrace);

                Console.WriteLine("Error! message:" + ex.StackTrace);

                Console.WriteLine("press any key to exit ...");

                Console.Read();

            }

        }


        static void DeleteEventHandler(SPList splist, string eventtype, string strClassNme)
        {
            SPEventReceiverType type = (SPEventReceiverType)Enum.Parse(typeof(SPEventReceiverType), eventtype, true);

            for (int i = 0; i < splist.EventReceivers.Count; i++)
            {
                if (splist.EventReceivers[i].Class == strClassNme)
                {
                    if (splist.EventReceivers[i].Type == type)
                    {
                        splist.EventReceivers[i].Delete();
                        splist.Update();
                        Console.WriteLine(eventtype + " Event deleted to " + splist.Title + " list.");
                    }
                }               
            }
        }


        public static void usage()
        {
            Console.WriteLine("Format: AttachEventHandlerToSPList <site url> <List Name> <Event Receivers> <Assembly Path> \n" +
                              "<site url>             -  The sharepoint site url \n" +
                              "<List Name>            -  The display name of the list \n" +
                              "<Event Receivers>      -  The type of event receivers \n" +
                              "                          separated by ';'. (e.g. itemadded;itemupdated) \n" +
                              "<Assembly Path>        -  The location path of the assembly.");

            Console.WriteLine("e.g. Attach the eventhandler in the List: \n" +
                              "AttachEventHandlerToSPList http://www.abc.com/log ListName itemadded;itemupdated C:\\Sample.dll ");
        }
    }
}